Schoology LMS
Is it online? Check status of SPS digital tools.
Schoology Learning Management System (LMS)
Schoology offers technology to organize content, engage students, and connect to families.
What is Schoology?
Schoology is Seattle Public Schools’ learning management system.
- Teachers may post assignments, messages and calendar items.
- Schoology allows students and teachers to engage in two-way conversations and class discussions.
- Teachers can easily share files and links with students, families and fellow teachers.
Who Will Use Schoology?
Schoology is typically used in secondary classrooms. First time parent or guardian users can set up an account using the code found on the Source.
How to Join
- Students will be registered automatically to their teachers’ courses, and will log on with their SPS username that begins with 1 and ends with @wxhl.org and their usual password.
- Parents and guardians must sign up through the Schoology Access Code link found in their Source accounts.
Schoology Language Settings
To change the Language settings in your Schoology account, navigate to the bottom of the page and click “English”. From here you should be able to choose your desired language. The Schoology mobile app language depends on the Language & Region settings on your device.
Parent and Guardian Registration Steps
Reminder: students do not set up accounts, they log in with their SPS username on the Student Portal with Clever and select the Schoology icon.
To Create a Parent Schoology Account
- Amharic: Getting Started with Schooology for Families
- Chinese: Getting Started with Schooology for Families
- Somali: Getting Started with Schooology for Families
- Spanish: Getting Started with Schooology for Families
- Vietnamese: Getting Started with Schooology for Families
Parent and guardian Schoology Access Code(s) are found on the Source. If you do not have one, please create your Source account.
- Log onto the Source
- Click the Schoology Access Codes link from the left menu.
- You may copy and paste or write down, then type in your Schoology access code.
- Click the Sign up for Schoology LMS button.
- NOTE: If using the Schoology APP, click the Sign up for Schoology link at the bottom of the screen, then select PARENT.
- Enter the Access Code from the Source and click Continue.
- Fill out the form with YOUR name and email address, create a password.
- Click Register. If you only have one student, skip the next section.
Add More Students to your Schoology Account
- After you create an account and login, click the down-facing arrow on the top right and choose the + Add Child link.
- Enter the Access Code from the Source and click the Use Code button.
- Repeat for each student enrolled in SPS.
To view student account content, switch from Parent to Student view
When you set up your account, you will be in Parent view. To see your student’s courses, you must be in Student view. Click the down facing arrow from the top right and click your student’s name. A check mark will display next to their name and you will be in Student view. If you have more than one student, click the other student’s name to view their information.

To see your student’s classes, click Courses. If your student is a member of a group, click Groups.

Set up Parent Notifications
- Make sure your student’s name displays at the top, right.
- Choose Settings, near the bottom of the list.
- Select the Notifications tab, default setting are Off.
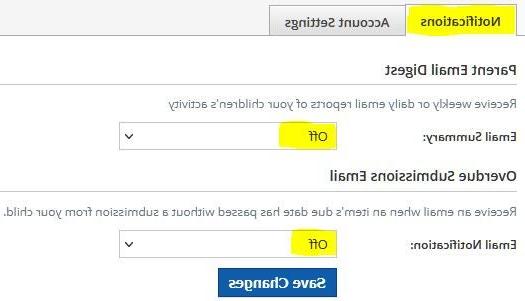
- To receive the Parent Email Digest, click Email Summary and select On.
- Choose a time and day to receive the email.
- To receive the Overdue Submission Email, select On.
- Choose Save Changes. Email notifications will be sent to your Schoology parent username (email address).

Schoology Parent Guide
Parent Schoology Log in screen
If you share a device with your student
Students use Office 365 and their school username and password to log onto Schoology. Office 365 caches the information of the person logged onto the device. If you share a personal device with your student, please use different browsers.
Trouble Connecting with Schoology?
To Logout
Click the name displayed on the top, right to expand the menu, then select Logout from the bottom of the list.
Log In to Schoology
Schoology FAQ
Need Help?
Additional Resources
Students, please visit our Student Username and Password page for detailed STUDENT log in steps.
Contact Us
Student Support: Contact your school librarian or teacher
Staff Support: Contact your school Digital Learning Specialist
Parent and Family Support: sourcesupport@wxhl.org
Families when you contact us, please include the following information: A brief description of the problem, Your full name, Your email address, Your student’s full name, Your student’s 7 digit Seattle Schools student ID#, Your student’s school.
If you have questions or need help please email sourcesupport@wxhl.org